A domain transfer is the process of moving your domain name from one registrar to another. It can often be a confusing process, but we will show you some best practices and how to transfer a domain name with little to no downtime. This article will ensure your transfer is as smooth as possible.
Basic Steps to Transfer a Domain:
Confirm Your Domain is Eligible for Transfer
Wait at least 60 days after registering domain
Check domain is not on hold or suspended
Make Preparations for Your Domain Transfer
Update contact information
Unlock your domain
Obtain auth/EPP code
Purchase a Domain Transfer From a New Registrar
Authorize the Domain Transfer
Since each domain registrar or web hosting company is different, your process may vary. Overall, this process is usually pretty universal across companies.
Confirm Your Domain is Eligible for Transfer
Per ICANN’s Policy on Transfer of Registrations between Registrars, domains that are less than 60 days old or were transferred between Registrars within the last 60 days cannot be transferred. Please wait at least 60 days before transferring.
You also want to make sure your domain is not currently on hold or suspended.
Make Preparations for Your Domain Transfer
First, you will want to update any contact information you have on file at your current registrar. This is important as it is used by the WHOIS database and the new registrar to verify your identity and reduce any delays. Make sure you disable privacy protection (if enabled) – it protects your contact information from being publicly viewable and your new registrar needs access to this contact information for the transfer. Depending on the registrar, you may be required to check your email in order to update your contact information.
Now that your contact information is up-to-date, you will need to unlock your domain. The domain lock is enabled by default to prevent any accidental or unauthorized changes to your domain name. Once the lock has been disabled, you can usually obtain the authorization or EPP code. This code is needed by the new registrar. In rare cases, if you cannot obtain this code, you may need to contact your registrar’s support team.
Want to avoid downtime? We highly recommend that you write down your current DNS settings BEFORE you initiate the transfer. This way you can quickly restore your DNS entries to the new registrar when the transfer completes. You can also change the default name servers to point to your web server, and then change your DNS settings over at your web host.
Purchase a Domain Transfer from a New Registrar
While Sparrow Leads isn’t a registrar, we do offer domain services from our partners, including domain transfers. When you begin this process, please ensure you are purchasing a “domain transfer” and not the domain name itself. You will go through a series of questions and checks, including your domain name, domain status and authorization / EPP code. Once these requirements are met, you can purchase the transfer.
Authorize the Domain Transfer
Upon order submission, the transfer will get initiated at the Registry, and the domain acquires ‘pendingTransfer’ status. Transfers that have reached this stage are automatically confirmed within 5 days. Finally, it may take an additional 24-48 hours for the Registry to complete the transfer. During this time, you will be unable to change any DNS settings, which is why it’s crucial to have this set up prior to the transfer taking place. This entire process and waiting period is by design, as it prevents any unauthorized changes to your domain name. In some cases, you will be required to manually verify and approve the transfer via email.
Let’s be honest, there are a LOT of choices when it comes to web hosting. If you are new to owning a website, choosing between the many options can seem like a daunting task. This guide will help you to break down the types of web hosting in detail so you can make a more educated decision.
Here are the main types of hosting you will often find:
Web hosting is a service that stores your website and data on a server for others to access publicly on the Internet. When you sign up with a hosting provider, you are renting space on a physical server, similar to buying a piece of land for your home. You can create a website locally on your computer, but hosting the site is what makes it accessible across the web. There are a number of web hosting companies, as well as types of hosting to choose from, which we’ll go into further detail below. Let’s get started!
Shared Hosting
Best For: Personal websites, startups and small businesses. This option is the most cost-effective for websites with limited traffic that don’t require many resources or bandwidth.
Shared hosting is extremely popular because of it’s ease of use and affordability. Most new website owners will choose this type of hosting. You will be sharing space and website resources with other users, hence where its name came from. Depending on the hosting provider, they may put either a few or many users on the same physical server, but will still be a great option if you are starting out, need to save money, or have limited traffic.
VPS Hosting
Best For: Growing businesses, developers and high-traffic websites. A great option for those looking for increased performance and server control. A VPS may require some technical expertise.
The middle ground between shared hosting and dedicated hosting is a VPS or Virtual Private Server. While the main physical server is still shared with other users, it’s split into multiple virtual machines each with their own amount of allocated resources. This allows you to have dedicated resources while being less expensive than a dedicated server. A VPS is highly customizable and usually comes in two flavors: Managed and Unmanaged. For Unmanaged, you may need more technical expertise. A VPS also allows you root access to the server, and won’t impact your website if other websites get increased traffic.
Dedicated Hosting
Best For: Medium to large businesses, application developers, and resource-intensive websites. Dedicated hosting provides full server control and requires technical expertise.
If you are a tech nerd like us, this is where things get fun! With dedicated hosting, you will get an entire server to yourself, while not having to worry about sharing resources like CPU, RAM, hard drive space, or bandwidth. However, this does come at a much higher cost than a VPS or shared hosting and is usually geared towards medium to large businesses. Website owners seeking a dedicated server usually have high-traffic websites or custom applications that need the extra power, security and full server control.
WordPress Hosting
Best For: Small to medium businesses looking for a managed WordPress solution, tailored customer support and ease-of-use.
WordPress hosting is a beginner-friendly and low-cost option that has everything you need to setup a WordPress site with very little effort. This type of managed hosting will provide an optimized server environment specifically tailored to WordPress that helps you get the best speed and performance out of the CMS (content management system). Features often include pre-installed themes, automated backups and plugins that focus on caching, security and performance. This may not be the best solution if you are planning to use another CMS, need more server flexibility, or you don’t have a WordPress site.
Cloud Hosting
Best For: Businesses that require high availability or experience large spikes in traffic. Cloud hosting is a cost-effective option for those who need more control and high uptime.
Cloud hosting is a highly scalable and highly reliable type of hosting when compared to the traditional types of web hosting we’ve talked about. It relies on multiple virtual servers working together, which allow you to scale up or down depending on your needs. If a server in the cloud goes down, another server can instantly be provisioned to keep the website up and running. This eliminates any downtime or loss to performance. You get a flexible pay-as-you-go pricing structure, whereas traditional hosting depends on the current package you are signed up for. Some popular cloud service providers include Microsoft Azure, Google Cloud and Amazon Web Services (AWS).
Disclosure: This post may contain affiliate links, meaning if you click on a link and decide to make a purchase, we will receive a commission. The price of an item is the same whether it is an affiliate link or not. Regardless, we only recommend products or services we believe will add value to our readers. By using the affiliate links, you are helping support our website, and we genuinely appreciate your support.
Your website is an incredibly powerful digital marketing tool. A well-designed website should build trust with your visitors, but a poorly designed website can often drive your potential customers away. Here are 8 things your website is missing that will help attract new visitors and keep them coming back!
This should come as no surprise, but visitors want to know what you do, and be able to quickly find information to help solve their problem. This can be a number of things, such as finding a product they like, learning about a new topic, or signing up for a subscription. Never assume potential customers know what you do, even if you think it’s obvious. You will want to clearly state what your company offers and how you can help THEM. Remember to keep your language customer-focused and use simple keywords that your target audience is likely searching for.
Clear Navigation
Your navigation is just as important as the content on your site. Don’t make visitors get lost in a bunch of sub-menus looking for information. List the most important information first and in a logical way that makes sense and is easy to follow. The more quickly someone can find the information they are looking for, the better.
Interesting Headlines
A headline is a natural attention-grabber and one of the first things a visitor sees when looking at news articles, social media, blog posts or search results. Headlines can not only be used for SEO, but also foreshadow what’s going to happen next. Not many people will read a body of content without first scanning the headlines to make sure it’s what they want to read in the first place. When creating a headline, include numbers, statistics, keep it brief, and make it as specific as possible.
Content is King (Still)
You’ve heard this a million times before – but that’s because it truly is king. Content is what will bring a visitor to your website searching for an answer. It’s important you are writing high-quality and engaging content that readers find interesting. Blog articles are a great resource – like the one you are reading right now :). Blogs also serve as a way to boost your SEO and build credibility. It’s best to write about topics you find enjoyable, as it will come more naturally and can be a fun way to engage your audience.
Original Images
Many people that first start out go to a stock image service and slap on some stock photos they find. It’s that easy right? Wrong! And worst of all, you now look like everyone else out there with the exact same images floating around the web. It’s going to take a bit more work, but it pays to be unique with your images! It’s okay to take some basic stock photos, then customize them to fit your needs, but make sure you are using your company branding so each image has an original look. There are plenty of services available online, including Canva, Pixelied, and Adobe Express (formerly Adobe Spark). If you are looking for complete customization, check out desktop software such as Adobe Illustrator or Photoshop.
Our recommendation (Pixelied)
Pro Tip: Use an image optimizing plugin such as WP-Optimize, that ensures images on your site are properly compressed and optimized for both speed and quality to save on load times.
Call to Actions
So now that you’ve thought about providing high-quality and engaging content, you’ll want to include clear call-to-actions, or CTAs, starting with your homepage and throughout your website as needed. Getting visitors to land on your website is only half the battle. Now think about what it is you want them to do and give them an action to complete. Do you want more email signups? Do you want them to purchase a product or add something to their cart? Whatever it is, it needs to be clear and concise in a few spots throughout your page.
Easy to Find Contact Info
There is nothing more annoying than a visitor trying to get in contact with a company and coming up blank. It’s important for your business to have a human element because people want to be able to relate to you, before they can buy a product or build trust. Make your contact information easy to read and find by including a dedicated contact page or footer with an email, phone number and any social media accounts you might use to communicate with your followers.
Consistent Branding
An important part of building trust is making visitors feel comfortable when visiting your website. When you think of your favorite brands, chances are you can remember things like colors, typography, wording, images and logos. Most importantly, you probably remember how that brand made you feel. Consistent branding is about the experience, and whether or not the brand is successful, it’s going to illicit some kind of emotion.
Disclosure: This post may contain affiliate links, meaning if you click on a link and decide to make a purchase, we will receive a commission. The price of an item is the same whether it is an affiliate link or not. Regardless, we only recommend products or services we believe will add value to our readers. By using the affiliate links, you are helping support our website, and we genuinely appreciate your support.
Your website’s page speed is extremely important for ranking higher on search engines like Google, retaining visitor traffic, increasing conversion rates for online stores, and much more!
Did you know that 1 in 4 visitors will abandon a website that takes longer than 4 seconds to load? Also having an extra five seconds of page load time can increase your website’s bounce rate by more than 20%, according to an article from Section.io.
With more people using mobile devices than ever before, they expect their content to load as fast as possible wherever they are. Visitors won’t wait around forever! For business owners, this could mean a loss of revenue and site traffic, but it also makes for a poor user experience.
What is Page Speed?
Page speed is the time it takes for a single page on a website to load. It’s sometimes confused with site speed, which is the time it takes collectively to load multiple pages on a website. Page speed can also be known as “time to first byte”, which is how long it takes for your browser to receive the first byte of data from the web server.
Why is Page Speed Important?
Whether you have a business or personal website, you want the user to do something, like make a purchase, sign up for a subscription, or learn more about your brand. Your website’s page speed can have a good or bad impact of the user’s perception of your site. You don’t want to lose a customer before they even have a chance to look around. The general rule is to have a page that loads within 2-4 seconds, otherwise your bounce rates and subsequently your revenue can suffer.
Popular Page Speed Tools
Two of the most popular tools for measuring your page speed performance are Google’s Page Speed Insights and GTmetrix. Google’s tool is completely free, while GTmetrix has a free and paid tier. Both tools offer metrics for mobile and desktop, as well as suggestions you can take to optimize your site. On Page Speed Insights, you will find Core Web Vitals and Page Experience as two sets of technical page metrics that Google cares about. You can learn more about LCP, FID, CLS, TBT and other Core Web Vitals to better understand how they affect your page speed and mobile friendliness.
It’s important to note that these tools will give numeric scores that will vary, based on time of day and other factors. The scores are useful, but not necessary as a key performance indicator.
Best Ways to Optimize Your Website
Choose a fast and reliable web hosting provider.
Using a fast and reliable web hosting company plays a key role in website performance. Google’s algorithm looks for fast loading websites to provide its users with a better experience, and faster websites will get improved rankings. Sparrow Leads can offer reliable web hosting packages that give your website the speed it needs. Since our focus is on local and small businesses, you get tailored customer support, allowing you to get back to more important things like growing your business. If you have any questions, please don’t hesitate to ask how we can help.
Select a lightweight theme.
It’s crucial to select a lightweight theme when using website builders like WordPress. You should aim to only get the features you need. Many of the themes you see today will have too many features for small businesses to use effectively. We can help you choose highly optimized themes that won’t require a lot of plugins. It’s better to keep things clean and simple.
Reduce and optimize your JavaScript files
Chances are JavaScript is running most of your apps and features across your website. Because of this, there will be many files that need to be optimized. Aim to only pick plugins and apps that are from reputable sources, have frequent updates, and have high user reviews. Then use a plugin or CDN, as described in more detail below.
Compress and optimize your images
Images can be one of the main reasons why your site will slow down to a crawl. What you shouldn’t do is search Google for an image, download it and upload it to your site as is. Many images you find on search engines are larger than you need and are not optimized properly, if at all. WP Optimize is an excellent plugin that will automatically compress and optimize your images as soon as you upload them. Also be sure to properly size your images based on the content you intend to use them for.
Use a caching service or plugin
Do you ever get asked a question that you immediately know the answer to? Usually this is because you’ve answered that same question many times. Caching works in a similar way. The first time a user visits your website, the server processes the request and sends it to the user. The second time the user requests the same website, it sends a cached copy that is already stored on the server. Your website will then load faster because it’s already processed and ready to view. When a new blog post or page is added to your site, the cache can be emptied at certain intervals so that new content gets served to the user.
In this article, we highly suggest a plugin called WP-Optimize that will help you reduce your JavaScript files, optimize your images, and cache your site. It’s an excellent plugin that does it all. Other popular plugins to check out are WP Rocket and WP Super Cache.
Use a Content Delivery Network (CDN)
The purpose of a CDN is to deliver content to users from a location closest to them. For example, loading images from a fast nearby server will drastically reduce load times compared to your single web server. A very well known security company, Cloudflare, offers a free and paid CDN and cache that works great with most websites. All our web hosting packages come with the option to use Cloudflare and you can easily change to another provider if you like.
Key Points
Page speed is the time it takes for a single page on a website to load.
1 in 4 visitors will abandon a website that takes longer than 4 seconds to load.
If you are a business owner, this means your bounce rate and revenue could suffer.
Two of the most popular tools for measuring your page speed performance: Google’s Page Speed Insights and GTmetrix.
Sparrow Leads can help you build and host a fast and high-quality website tailored to your perfect client!
Disclosure: This post may contain affiliate links, meaning if you click on a link and decide to make a purchase, we will receive a commission. The price of an item is the same whether it is an affiliate link or not. Regardless, we only recommend products or services we believe will add value to our readers. By using the affiliate links, you are helping support our website, and we genuinely appreciate your support.
If you’ve finished getting your website up and running, give yourself a pat on the back. The next step is making your site work for you. Here are six of the best WordPress plugins for business that will improve your site’s SEO performance and let you get back to the important things like getting new clients. Each of these plugins are free but may have a premium option that provide extended functionality.
Yoast SEO is a popular SEO plugin that takes the guesswork out of optimizing your site correctly for search engines. It’s critical that your website can be found by search engines like Google. Yoast SEO has a wealth of knowledge on their blog and guides you through the process of adding canonical tags, titles, meta descriptions, and much more!
When you need a simple, but robust backup/restore solution, look no further. Updraft Plus allows you to back up your WordPress files and database manually and on an automatic schedule. Store backups on your web host via FTP, or in the cloud with services like Google Drive or Dropbox. Opting for the paid version gives you more options, including backup to more services and dedicated support. Check out this article for a full comparison.
With a proper backup/restore solution like UpdraftPlus, you can rest assured that your website is protected from loss like web hosting failures, bad plugin or theme updates, server crashes and more.
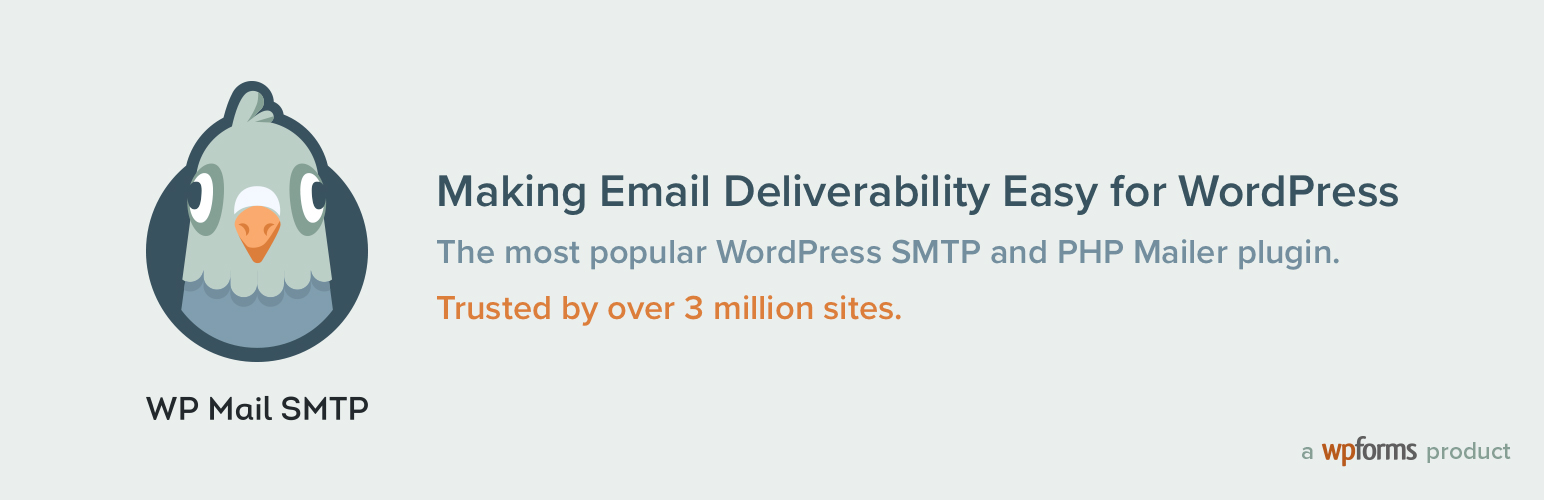
Many web hosting providers allow users to send/receive email using what’s called their “local mail exchange”. This just means that the same server in which you’re hosting your website, is also sending your email. Some deliverability problems can arise from this method. Where WP Mail SMTP shines is setting up your website to use an SMTP server such as Gmail, SendGrid, Mailgun, or another SMTP service to send mail. Ensuring proper email deliverability is critical for reaching your users and letting them know you are the person sending the email.
From the makers of UpdraftPlus! Caching plugins are important for speeding up your website for SEO and providing a better user experience. This is especially true when using shared hosting plans, where your main goal is to keep costs down. WP-Optimize does an excellent job of compressing images, caching and minimizing CSS and JS files, and even optimizing your database tables. The final result is a highly optimized site that performs better in page speed tests and loads faster for your visitors.
Does your business sell products online? WooCommerce and Shopify are the two most popular platforms for setting up your ecommerce store online. Shopify is a cloud-based solution, whereas WooCommerce is an addition to your current WordPress site. WooCommerce has a higher learning curve than Shopify, but it’s completely free to use and has endless customization with free and paid plugins and themes. However, if you are looking for a more ready out-of-the-box option, you might want to choose Shopify. If some technical know-how doesn’t deter you and you want a free solution, WooCommerce is an excellent choice for those running a WordPress site.
The General Data Protection Regulation (GDPR) was implemented on May 25, 2018. It explains the 7 principles related to personal data and privacy of EU citizens. Because of this, you may have noticed that cookie notices are everywhere, from small business websites to corporate companies. This plugin makes it easy to display a cookie notice to the user on how you handle their data.
As a small business owner, you are probably asking yourself, “Why should I hire a web designer?” It’s possible you are starting out with no money and simply can’t afford to pay for something you might be able to do on your own. However, here are the top reasons why you should consider hiring a web designer for your business.
Save Time and Money
There is definitely a truth in saving money up front by doing the entire website by yourself. It might not pay off in the long run though, given the amount of time you need for learning new skills, deciding which platform to use, setting up a domain name, and adding content. Your time is a valuable thing, which is why we either trade our time for money, or money for time. Freeing up this valuable time for more important tasks within your business can help you achieve a lot more productivity, which leads to the next reason.
A Worthwhile Investment
If time is money, then spending money on something worthwhile like your business website can be a huge return on investment. Consider when you want to buy furniture for your home. In most cases, you will want to buy from a furniture store, rather than learning about woodworking, as well as buying all of the necessary tools and equipment. Your time is much better spent on buying a ready made product that has been built by someone who is experienced in that field. It’s best to think of web design with a similar approach, knowing that you are spending money and getting a high-quality product in return that will scale with your business, attract customers, and increase sales. If done right, those sales will far exceed the cost of hiring someone to do the job for you.
Look Professional & Unique
Many website builders include common themes that are used by hundreds or even thousands of other users. This can make your website look very cookie-cutter and unprofessional. A web designer can customize the exact look and feel of your brand. You will walk away with an outstanding design that speaks for itself. This kind of branding will help visitors more easily recognize your business and help it stand out against your competition.
It Helps Customers Find You (SEO)
These three letters (SEO) have such a tremendous impact on your website and business. Search Engine Optimization used to be all about keywords, but it goes far beyond that today. Crafting great content, designing mobile-friendly pages, and developing a logical site structure all play an important role in directing more traffic to your website and getting in front of the right audience.
It Works on All Devices
A large portion of website visitors are mobile users. In fact, mobile devices drove 61% of visits to U.S. websites in 2020. It’s extremely important to have both a desktop and mobile responsive website that works across various devices and browsers. This allows you to maximize your reach. While many web builders have responsive features, a web designer can help in much more detail.
Marketing Strategy
It’s not enough to have a great looking website; it also has to work well for its visitors. Marketing strategy is all about defining the goal of the website, creating an effective customer journey that gets them working closely with your business, and focusing on achieving those goals. In simple terms, ask yourself what you want your website to achieve, but also how are you going to reach those goals? If you hire a web designer to help answer those questions and build a strategy, your business will thank you for it!
Let’s Build Something Together!
Sparrow Theory would love to talk strategy with you! We believe having a great website is just the beginning. Our services also include web hosting and digital marketing to maximize the potential reach of your business.
If you’re looking for other options that Sparrow Theory doesn’t yet offer, please check out these Web Design brands.
If you’re interested in learning more, please contact us on our website.
I was recently building a Power App for a work project and needed to have a combo box display the primary text field from one data source, while having the secondary text field display from another data source. Here’s how to display 2 data sources in a Power Apps combo box:
We will be using the AddColumns and LookUp functions to essentially find a record that matches our criteria, while joining two tables together.
According to the documentation, here are the descriptions for each function respectively:
The AddColumns function adds a column to a table, and a formula defines the values in that column. Existing columns remain unmodified.
The formula is evaluated for each record of the table.
The LookUp function finds the first record in a table that satisfies a formula. Use LookUp to find a single record that matches one or more criteria.
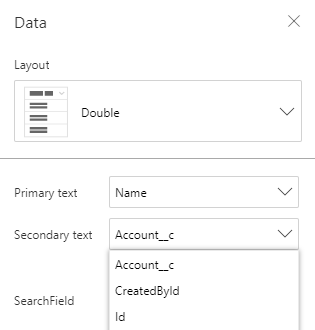
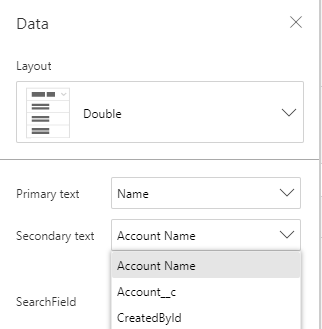
To break it down: AddColumns(Table1, “New Column Name”, LookUp(Table2, ‘Column We Want to Look Up’ = Table2[@Table We Have to Compare Against], ‘Column We Want To Return’))
In the example below, I’m adding a column named “Account Name” to the Projects table. In order to find my “Account Name”, I am using the LookUp function to search the Accounts table for a record that matches “Account ID = Projects[@Account]”. The last argument of LookUp means I only want to return the “Account Name” column from the Accounts table.
There are three main parts to creating a resume builder in Power Apps. You will be learning PowerApps, SharePoint, and Power Automate (formerly Flow) which allow the user to create, edit, clone and delete resumes, as well as email a resume in PDF format. For the PDF version of the resume, you will need to know some HTML because we will use Power Automate to convert our data into HTML then to PDF.
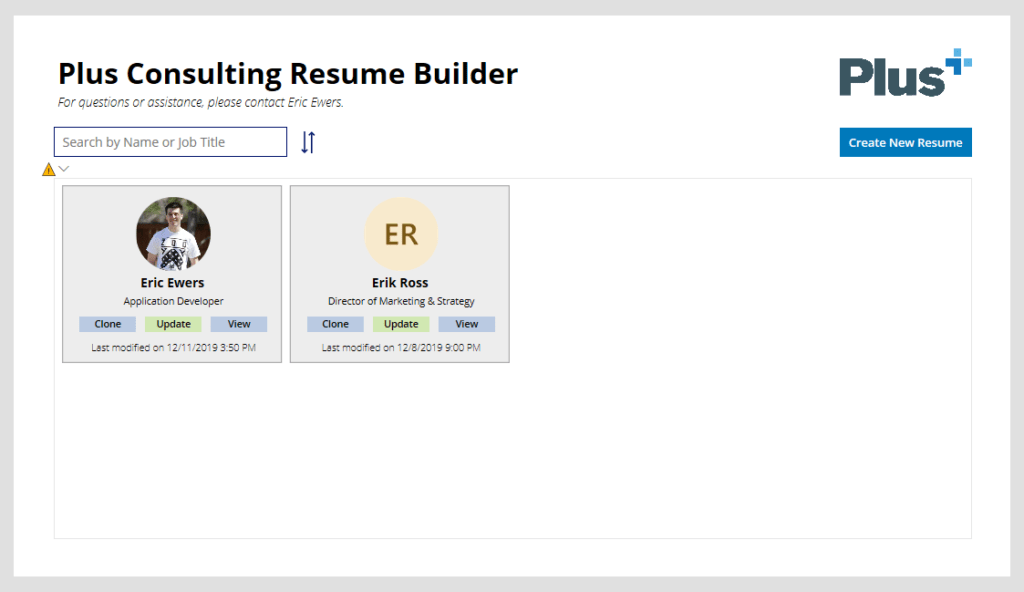
The final product looks something like this.
Before we begin, I want to stress the importance of naming elements and organization. I prefer to use camel case for most of my elements. This ensures you can reference your code as easily as possible, so please come up with a naming convention and stick to it!
Part 1: SharePoint
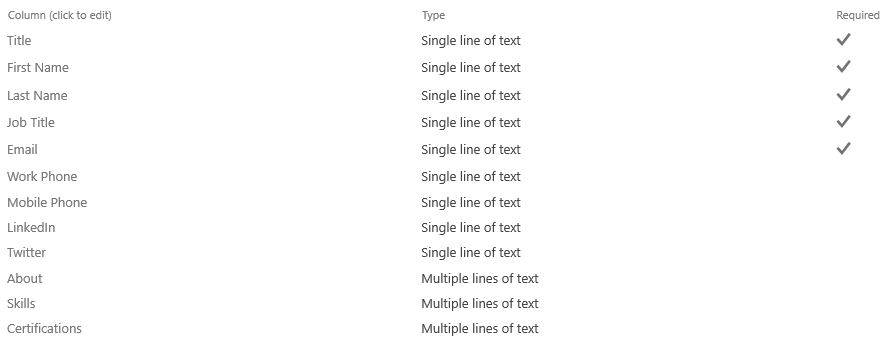
First, let’s create a new list in SharePoint to use for storing the resume data. I named my list “Resumes” and added some basic columns to start.
Once you have a SharePoint list created, you are ready to move on to Power Apps!
Part 2: Power Apps
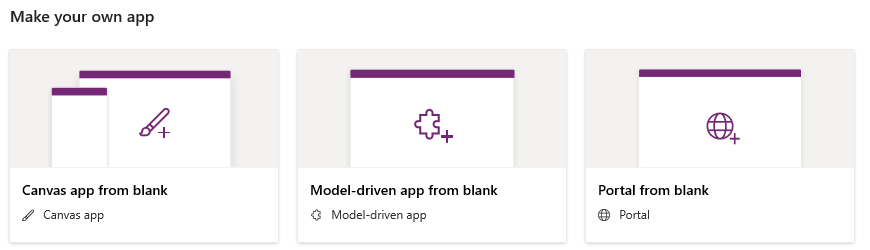
Create a new Power Apps “canvas app from blank”.
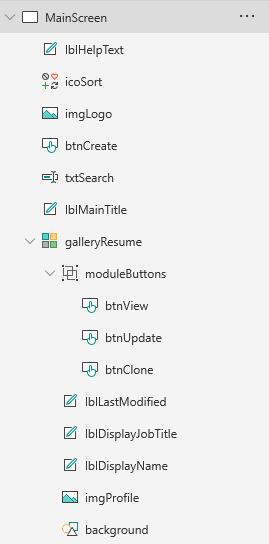
Your first screen should be added for you already. This page will consist of a gallery, some text labels, text inputs, buttons, and images. For the main elements, I have some text, a search box with filter icon, company logo and a button to create a new resume.
The “Create New Resume” button’s “OnSelect” property sets a global variable named “NewResume” to true, creates a new form called “ResumeForm”, and navigates to the Edit Screen. We will get to this further in the tutorial.
For the sort button next to the search box, we simply toggle a variable named SortDescending1 between true/false. Note that this is not a global variable and will only work on the current screen.
Once you create your gallery, it will ask for a data source. This will be the SharePoint list you created in step 1. For my gallery, I chose to create a 4-column layout consisting of an image, three text labels and three buttons.
User Image
For our user image, we will be using the Office365Users connector. The “Image” property of our image will find the user by email and if the user has a photo, display it…otherwise show a default image.
Below is the “Text” property of the two text labels, respectively. “Title” is a default column, so I will be using it as the resume title. Even though my example image above shows the users name, this is really the title column. This ensures that when we clone resumes, we can set a title and distinguish between resumes.
ThisItem.Title
ThisItem.'Job Title'
Update Button
The following code is for the “OnSelect” property. If NewResume is true (i.e. we clicked the “Create New Resume” button), then set NewResume to false, then reset the form and navigate to the Edit Screen.
This completes the main screen. As mentioned before, I like to name files descriptively, so that referencing them is easier. An example is shown below.
Edit Screen
Now we move on to our edit screen (which also acts as our create screen). This screen consists of a text label, four buttons (1 hidden), and a form.
The “Create Resume” label at the top will dynamically change based on if we are editing or creating a resume. Set the “Text” property to change the text based on the boolean value of NewResume.
If(NewResume, "Create Resume", "Edit Resume")
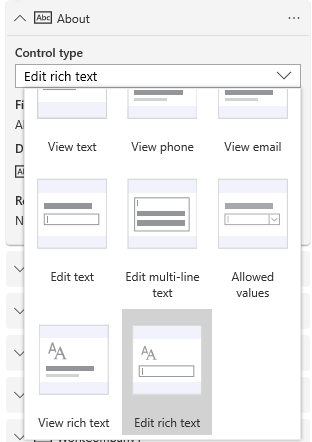
Now create a new form and set the DataSource to your SharePoint list. You can pull in all the fields you previously created and choose which to include in your form. For any multi-text fields, you will want to edit the field and select “Edit rich text” as the control type.
Buttons
There is much to look at here, so I highly suggest reading the documentation to learn more about these functions. The Save/Send button will do the following: 1) Patch to update record data in our SharePoint list 2) Set to set the value of a global variable named “LastRecord” (which gets the ID of the last record entered so that we can send the ID to Power Automate) 3) Run the “SendResume” Flow using the last record ID 4) Reset the form if creating a new resume 5) Navigate back to the main screen and refresh the data.
The cancel button is simple, as it just navigates back to main screen.
Navigate(MainScreen)
For the hidden delete button, we want it to navigate to the main screen and refresh the data set after removing the current record from the SharePoint list.
We are now ready to setup our flows inside of Power Automate. Start by clicking on the “Action” tab at the top of Power Apps, then Power Automate, then “Create a new flow”. Follow along in the next part.
Part 3: Power Automate
We will be creating two separate flows: one for sending/emailing our resume and the other for cloning our resume.
Flow #1: Send Resume
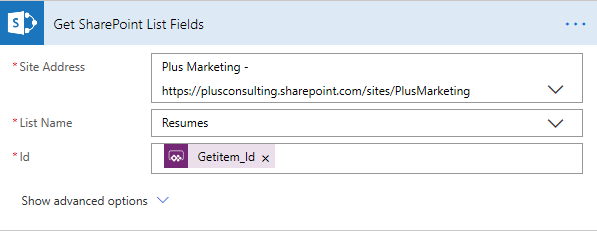
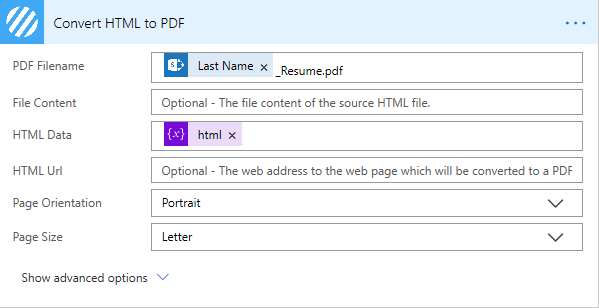
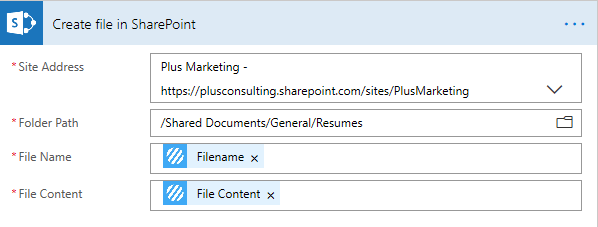
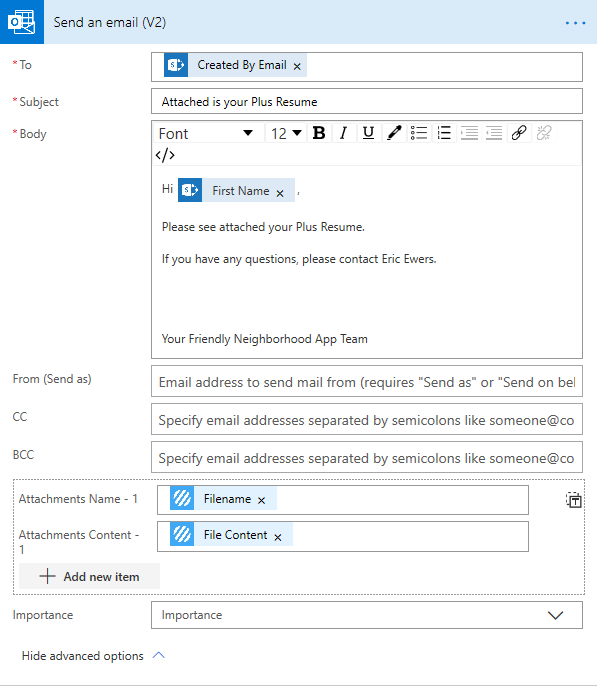
Here is a quick overview. We previously set the trigger inside Power Apps. The flow then gets the fields from our SharePoint list, as well as the user profile photo. It sends this data to a string variable (in which I have three). A plugin, Encodian, will also be used to correctly convert HTML to PDF, as the default provided by OneDrive doesn’t work the way we want. Afterwards, it stores that PDF on SharePoint so that we can view it later, and finally emails it to the user.
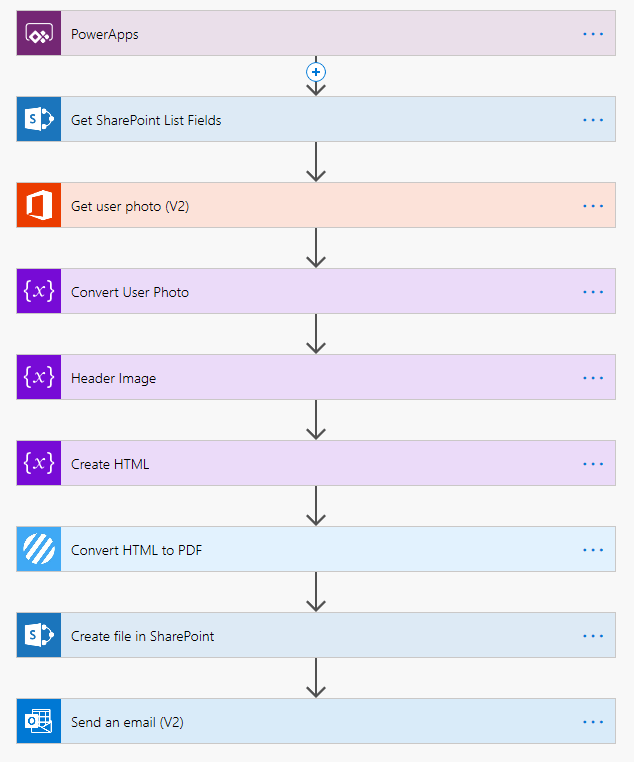
Get SharePoint List Fields (Get item)
Get User Photo
Convert User Photo (Base64) (Initialize variable)
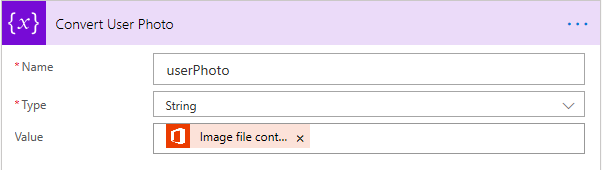
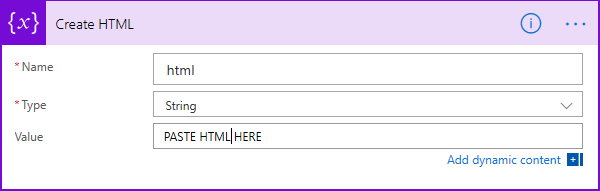
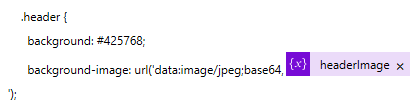
Header Image (if you have one) (Initialize variable)
Create HTML (Initialize variable)
After pasting your HTML code, you can use the user profile photo or header image like so (CSS and HTML examples)
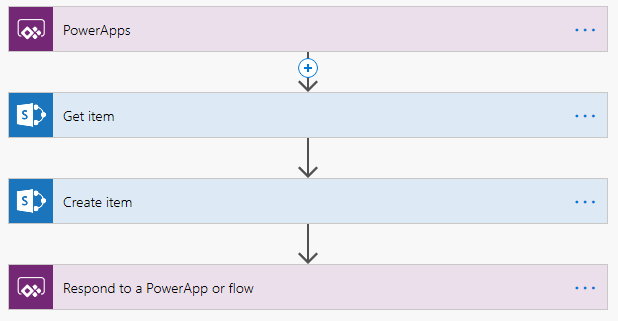
Here is another overview. We set the trigger in Power Apps, get the SharePoint fields, duplicate the record, and report back to Power Apps.
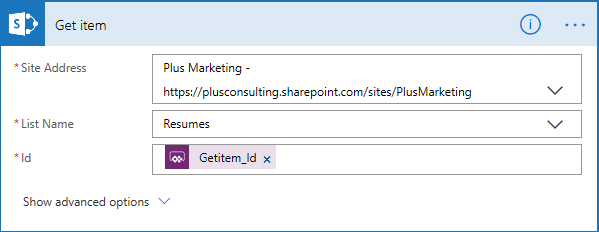
Get item
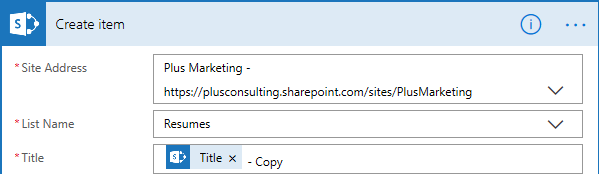
Create item
Make sure to fill in any fields you might want to duplicate. Then change the Title field to append ” – Copy” to the end.
Final Notes
Back in Power Apps, edit the “OnSelect” property of the Clone button, replacing “NameofYourFlow”.
NameofYourFlow.Run(ThisItem.ID); Refresh(Resumes)
And finally, edit the View button to launch the web URL of your SharePoint file that was created, making sure to include your naming convention so it knows which resume to point to.
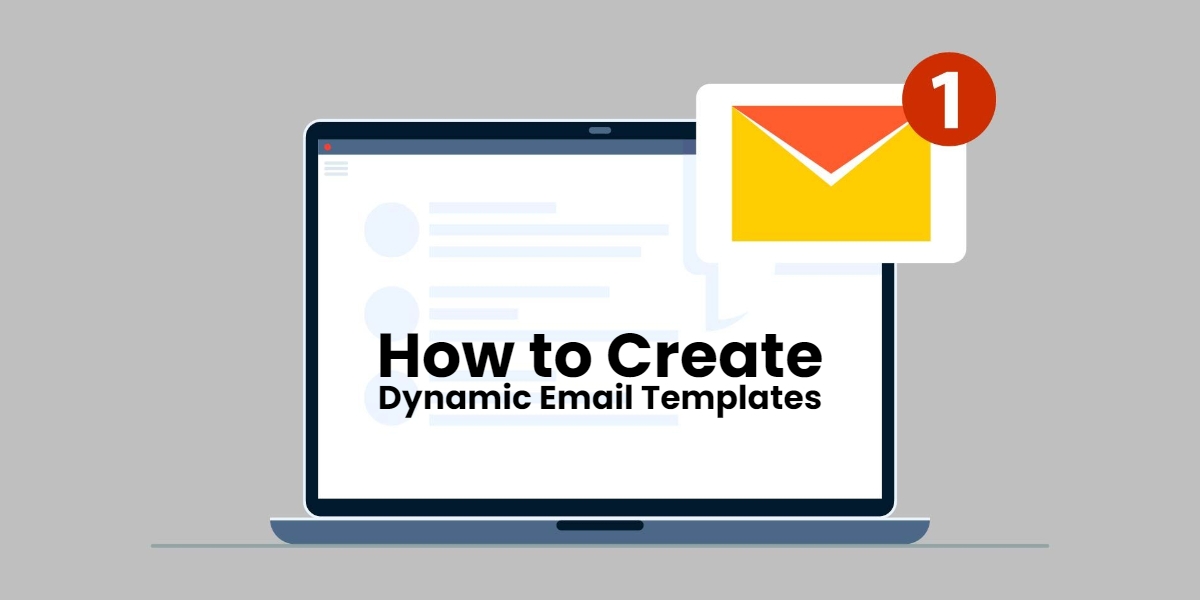
Creating email templates are often a time-consuming task, especially if these templates need to have the same overall look but be repeated with different content for each recipient. When you consider the number of variables and data that change, the task can seem a bit daunting without some kind of automation. In this article, we show you how to create dynamic email templates using MySQL and the popular Handlebars.js templating engine. If the data already exists…there is no reason to recreate it. Instead, we can utilize a database to pull in the data we need, and Handlebars to populate our fields dynamically.
To begin, you can learn more about Handlebar.js and how it’s implemented here. Let’s start by grabbing the data we need in our MySQL database and outputting to JSON (JavaScript Object Notation) format. This is the format that your data must be in for Handlebars to accept it.
We will be creating 4 files for this project:
index.php (Main file)
data.json (Generated JSON file)
config.js (Configuration file)
template.html (Template file)
Procedural Method
index.php
// Connect to database
$host = 'localhost';
$user = 'username';
$pass = 'password';
$db = 'database';

$conn = mysqli_connect($host,$user,$pass,$db);

// Check connection
if (mysqli_connect_errno())
  {
  echo "Failed to connect to MySQL: " . mysqli_connect_error();
  }

// Get event data
$events = mysqli_query($conn,"SELECT * FROM events");

// Initiate empty array
$data_array = array();

// Loop through event data
while($row = mysqli_fetch_assoc($events)) {
	$data_array["event"] = $row;
}

// Output JSON to file
$fp = fopen('data.json', 'w');
fwrite($fp, json_encode($data_array));
fclose($fp);

mysqli_close($conn);
Object-Oriented Method
index.php
// Connect to database
$host = 'localhost';
$user = 'username';
$pass = 'password';
$db = 'database';

$conn = new mysqli($host, $user, $pass, $db);

// Check connection
if ($conn->connect_error) {
	die("Connection failed: " . $con->connect_error);
}

// Get event data
$sql = "SELECT * FROM events";

// Return results from query
$events = $conn->query($sql);

// Set empty array
$data_array = array();

// Set counter
$counter = 0;
$counter2 = 0;

// Loop through event data
while($row = $events->fetch_assoc()) {
	$data_array["event"] = $row;
}

// Output JSON to file
$fp = fopen('data.json', 'w');
fwrite($fp, json_encode($data_array));
fclose($fp);

$conn->close();
Here is an example of what our JSON file (data.json) might look like:
The above expression {{event.date}} would return “January 1, 2019” from our JSON file.
That’s about all there is to it! Now you can pull dynamic data from a MySQL database and insert those variables into your template.html file. I highly recommend reading more about the features of Handlebars.js and what it’s capable of doing. If you have any questions, please feel free to leave them in the comments!